Tuesday, June 11, 2013

Studio Envy

Until now, I have been sewing/making/running my handmade business out of my guest bedroom. Now, though, I have the opportunity to recreate my studio in a small space away from my home. Part of me is jumping out of my skin excited, while the other part is nervously clinging to the convenience of working at home, and dreading moving all of my junk.
I know that moving into a real workspace is a step in the right direction for the way I want my handmade business to grow, and I am committed to doing that. I just have a few reservations.
Here's a quick list of pros and cons that I am currently sorting through:

Pros:
  • I will have a dedicated workspace that I won't have to share.
  • I can schedule times to "go to work" instead of squeezing in projects when there's time.
  • It will be all mine, and I can do whatever works for me in terms of storage, setup, and decor.
  • It's free. Yes, that's right... I will be moving into a space that my boyfriend currently uses for storage, and he generously offered it to me to use as I wish. I know, right?
Cons:
  • The space is not in great shape. It is going to take a lot of sprucing up to turn it into a positive space where I can work creatively. When I say rough shape, I mean there is a bird problem. 
  • I will have to move all of my stuff, and probably have to get some new stuff... just little stuff that's annoying.
  • It's not home.  
I know I will eventually end up moving in, and taking on the whole renovation process, which can be exciting. I have a few ideas for how I want the space to be designed and set up, and I've been lurking around the internet trying to find some more inspiration. Like these lovely spaces...

This a really fun space with lots of natural light.
Moop Studios Feb 2011

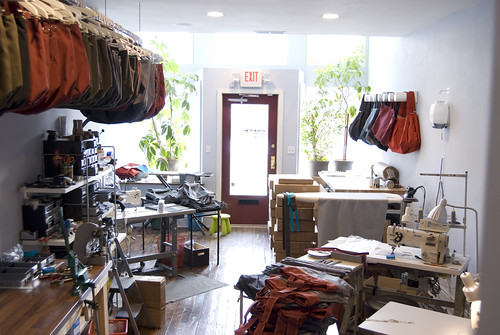
What a nice tidy desk.
 
This is a great way to store fabric where you can still see it all.

Leave it to Martha freaking Stewart to have this gorgeous packing and shipping department in her home. She is my hero.

Have any ideas for what I should do with my new studio? If you have a workspace, I'd love to see what it looks like!

Wednesday, February 20, 2013

DIY Beauty: Blow Dryer Curls

Hey out there!
I just tried a new hair technique that I saw on Pinterest, and IT WORKED! Whaaaat?!
I can't tell you how many crazy things I've seen on Pinterest that did not work out. But this one was legit. Here's the photo I pinned.
The picture comes from here. I can't tell if this is the original source or not (one of the major flaws of Pinterest), and there are no written instructions... just the picture.
So I followed the instructions (basically, with a little tweaking), and I LOVE the results. Here's what I did.
1. I blow dried my hair upside-down, focusing mainly on drying the roots.
2. When my hair was about 80% dry, I divided it into two sections on either side of my head.
3. I twisted the two sections in the direction away from my face.
4. I pinned one of the twists into a bun while I worked on drying the other twist.
 5. I blow dried each twist for about 3-5 minutes, then loosened them with my fingers.
6. I finished up with some anti-frizz junk (I use Biosilk) and some hairspray (medium hold).
 And so today I am rockin' these easy, natural-looking curls!

 I'm thinking of making 'DIY Beauty' a regular segment here on the blog... what do you think?

I'm linking up here,  here, here, and here

Monday, February 11, 2013

Valentine's Day Coupons Re-Post

Today I am re-posting a Valentine's day project that I did last year. I sewed up a cute little envelope and stuffed it with gift coupons. I included a free printable so you can print out and customize your own coupons too!


Click here to see the full tutorial and free printable coupons!
What are your Valentine's Day plans? I'd love to see your finished projects if you use this tutorial :)

Wednesday, February 6, 2013

Chevron Baby Quilt

Today I'm sharing a baby quilt that I whipped up in a day. Yeah, it was a pretty quick process.
No, I'm not having a baby, I just wanted to try out a few techniques without being committed to a huge quilt.
 It's a chevron quilt with no binding! I am not a fan of binding quilts, and apparently I will search high and low for a way to get out of it.
 I also rounded the corners, because I just think it's a softer detail for babies. I had visions of a baby poking itself in the eye with the sharp corner of a quilt, and thought maybe I better just round these things off.
 I bought the fabric for this quilt a long time ago, but hadn't used it because quilts just seem to take forever. I never thought I would be done in less than a day.
 I love that it's gender neutral so that I can give it to the first person I know that has a baby. I just have an awesome baby gift ready to go as soon as I get an announcement. No pressure though.
If you're wondering how to quilt without binding, check out this post from Red Pepper Quilts.
Here are two other quilts that inspired me:


Have you ever made a baby quilt? Or have you attempted the chevron technique? Let me know what's up in the comments below.

Thursday, January 31, 2013

Leather Boots Refashion

Last year I bought two pairs of these boots from Fossil, the retail store where I work part-time. They were on SUPER sale, and with my employee discount they were unbelievably inexpensive. That's why I bought two pairs. So the price was right, and the boots were comfortable, all leather, and had a nice woven detail on the side. But there was one thing that I didn't consider: I didn't love them.
Why do I do that to myself? I can't pass up a good deal, even on items that I don't need or necessarily want.
Anyway, I was cleaning out my closet recently, and I found the boots that I had only worn a handful of times, and decided it was time to change them into something I would actually wear.
So they started out looking like this:
They weren't ugly or anything, but my main complaint was that they were too tall for my shorty legs. I like wearing tall socks that peek out at the top of my boots, but these went all the way up to my knee. And I felt a little like a go-go dancer when I wore them.
So I decided I could do without that band around the top. Here's how I did it.
I unpicked the inside seam where the top leather band meets the lining fabric (isn't the fabric cute?).

Then I unpicked the seam that attached the top band to the outside of the boot, and the whole top came off easily.

After removing the inner piping (no picture of that... it's just a piece of rope that was tucked up behind the leather so that it would give it that rim around the outside,) I cut off about 3/4" from the top band piece. I had to cut very straight because I knew I would be re-attaching this piece to the top of the boots.

I tucked in the excess lining fabric and held it in place with binder clips. I didn't use pins because I didn't want to poke holes in the leather.

And then I simply re-attached the trim piece that I cut from the top band.

And my boots were done!

All said and done, I only spent about an hour and a half on the project, and I got the results I wanted! So now I am going to tackle that second pair of boots. I'm still trying to decide if I want to shorten them like I did to these, or try something new! Let me know what you think in the comments below.

Wednesday, January 30, 2013

DIY Style

We all like to look good, right? Don't get me wrong, I L-O-V-E shopping, but there are so many great things about customizing your clothes that you just can't get from a store-bought garment. Today, I'd like to share some great DIYs that I've been wanting to try on my own wardrobe.
First is this "Fat Quarter" infinity scarf by Jessica at Sew Homegrown. I have so many fat quarters in my fabric stash that would make a perfect infinity scarf, and this one is warm and cozy. I hope I can get around to making one before the cold weather goes away! You can make one too... there is a full tutorial here.
Next, LifeAnnStyle will show you (and me!) how to make these pretty boho braided bracelets. They look very simple, and I am in love with wrap bracelets right now. Check it out here.
Do you have a cardigan lying around that is cute, but you never wear it because it seems too plain? I know I have a few. Look what Anna from In Honor of Design did to spruce up her unworn cardis! I love the heart patch pocket! See her other easy DIYs here.
I hope you have a few minutes to spare because once I show you this next project, you're gonna want to head over to Madeline's blog, Uber Chic for Cheap and check out all of her other fabulous style DIYs. Here is just one of her many projects that I can't wait to try. Colorblock tees! What?! It's no secret that colorblocking is a style staple that is sticking around for awhile, and this is the perfect way to incorporate it into your wardrobe (for cheap!).

I can't decide which of these lovely style DIYs I want to try first! I'll keep you updated and share if and when I do take on one of these fairly simple projects.

Monday, January 28, 2013

Victorian Ladies

Remember these lovely ladies?
If you missed it, I posted this picture on my Facebook page of some unfinished felt cameos that I made. Well here is what they look like now!
 The "Victorian Lady Cosmetic Bags" are now available at Downtown Sol, the brick-and-mortar shop in Oxnard that carries my products. Soon I will list them in my Etsy shop, and I would like to take custom orders so if you would like to see these in specific colors, leave a comment below. They will be listed at $12 each, plus shipping.
I have also been making some sweet colorblock items for Spring 2013. Here is my "Colorblock Tote Bag" and my "Colorblock Mini Cosmetic Pouch."
That's what I've been up to lately. Have you made anything recently?

Wednesday, January 9, 2013

Handmade Home

So it's been awhile since I gave my blog the love it deserves, but I made a new year's resolution to be more productive and to improve my web presence. I have a bunch of new items to add to my Etsy shop, and I have some great DIY projects to share.
For now, I would love to entertain you with another installment of Handmade Home. These posts are so fun to put together because I just drool over all the pretty home decor ideas on Pinterest, and I love spotlighting other artisans who make things from their home for yours.
Enjoy!

This is such a cute DIY project anyone can do. I already have most of these items in my home so the cost would be minimal. Inspire, Design, & Create gives a full tutorial here.

These nautical rope vases are so simple to make. They are featured on Bayside Bride, which is (obviously) a wedding site, but they are so GORGEOUS that you could use them as everyday home decor. Change out the flowers to make them seasonal and boom. Prettiness.

To me, there are few things more satisfying than taking something you already own and spiffing it up into something you love even more. That's what Mallory from Hayseed Homemakin' did with this old end table. She wasn't digging the finish, so she stained it to match the rest of her barnwood furniture.Genius!

Now to highlight some artisans who sell some great handmade household items.
Monika from Zig Zag Studios on Etsy makes and sells these incredible floor cushions. Naturally I'm obsessed with this one in yellow ikat.

I. LOVE. HOOP ART. Seriously. It is so wonderfully customizable to any home. I have been wanting to make some of my own to display on my walls, but this set from Love, Maude on Etsy is so much better than what I am capable of making. I always say, when you can't DIY, buy it from someone who can. Check out the rest of her shop too. It's all so pretty.

That's all for today, friends. I'll see you around soon.