Monday, January 28, 2013

Victorian Ladies

Remember these lovely ladies?
If you missed it, I posted this picture on my Facebook page of some unfinished felt cameos that I made. Well here is what they look like now!
 The "Victorian Lady Cosmetic Bags" are now available at Downtown Sol, the brick-and-mortar shop in Oxnard that carries my products. Soon I will list them in my Etsy shop, and I would like to take custom orders so if you would like to see these in specific colors, leave a comment below. They will be listed at $12 each, plus shipping.
I have also been making some sweet colorblock items for Spring 2013. Here is my "Colorblock Tote Bag" and my "Colorblock Mini Cosmetic Pouch."
That's what I've been up to lately. Have you made anything recently?

Wednesday, January 9, 2013

Handmade Home

So it's been awhile since I gave my blog the love it deserves, but I made a new year's resolution to be more productive and to improve my web presence. I have a bunch of new items to add to my Etsy shop, and I have some great DIY projects to share.
For now, I would love to entertain you with another installment of Handmade Home. These posts are so fun to put together because I just drool over all the pretty home decor ideas on Pinterest, and I love spotlighting other artisans who make things from their home for yours.
Enjoy!

This is such a cute DIY project anyone can do. I already have most of these items in my home so the cost would be minimal. Inspire, Design, & Create gives a full tutorial here.

These nautical rope vases are so simple to make. They are featured on Bayside Bride, which is (obviously) a wedding site, but they are so GORGEOUS that you could use them as everyday home decor. Change out the flowers to make them seasonal and boom. Prettiness.

To me, there are few things more satisfying than taking something you already own and spiffing it up into something you love even more. That's what Mallory from Hayseed Homemakin' did with this old end table. She wasn't digging the finish, so she stained it to match the rest of her barnwood furniture.Genius!

Now to highlight some artisans who sell some great handmade household items.
Monika from Zig Zag Studios on Etsy makes and sells these incredible floor cushions. Naturally I'm obsessed with this one in yellow ikat.

I. LOVE. HOOP ART. Seriously. It is so wonderfully customizable to any home. I have been wanting to make some of my own to display on my walls, but this set from Love, Maude on Etsy is so much better than what I am capable of making. I always say, when you can't DIY, buy it from someone who can. Check out the rest of her shop too. It's all so pretty.

That's all for today, friends. I'll see you around soon.

Friday, February 10, 2012

DIY of the day

Guess what I did today...
I did my own french tip manicure!

I've tried it several different ways with varying results. You can stick tape onto your nails and use it as a template, but that usually leaves a tiny lip in the paint. You can use one of those paint pens, but I've found they usually chip after only a day or two.
To get the best results, I've found this works best for me.
1. Start with clean, dry nails.
2. Slap on some white polish, staying mostly on the tip, but don't worry about going outside the lines. You may need more than one coat.
3. After the polish has dried (really dry... I'd wait an hour), use a flat-tipped paint brush and nail polish remover to take off the excess polish. I used the cap of the nail polish remover, and just dipped the brush in to get a tiny bit. Use a paper towel to blot if the brush gets too wet. A curved back-and-forth motion will create a natural-looking line.
4. Finish with a top coat and a pat on the back. Now do your toes!!!


Monday, January 30, 2012

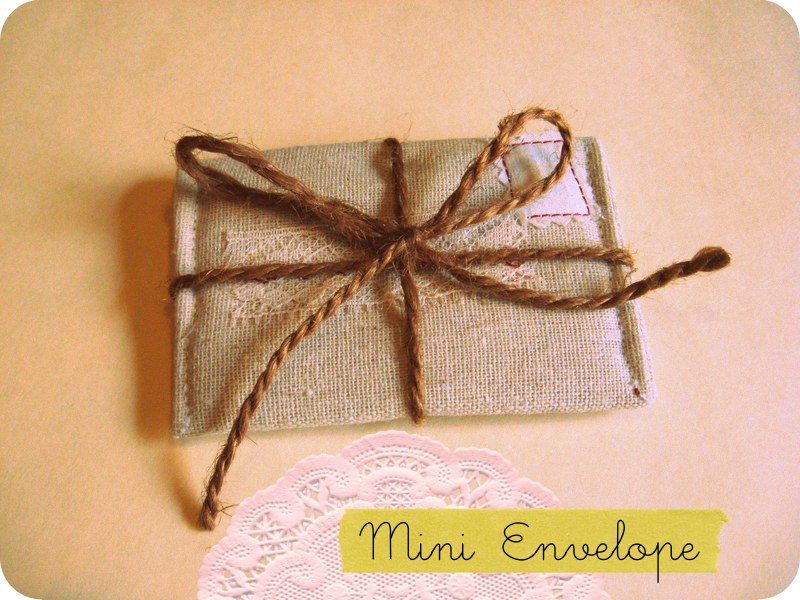
Mini Valentine Envelopes


I thought I'd share a quick sewing project for Valentine's Day.

These mini envelopes are so simple to make. Give one to someone special, or make a few to give to friends. 

You will need to print out the pattern:
Envelope Pattern
(after printing, you may want to double check that the pattern measures 4" across)
For the envelope, you will need 3 pieces of fabric measuring 4” x 7 ½”: One for the outside, one for the inside, and one piece of batting. I used fusible batting, but you can use a scrap of quilt batting or fleece if that’s what you have on hand.

Cut out the envelope pattern and lay it flat on the fabric pieces. Use the pattern to trace and cut the points of the envelope.

Fold the pattern on the dotted lines and use a water-soluble marker to draw the guidelines for the stitching on the front side of the outer piece. Place the batting on the bottom of the outer fabric piece and then stitch over those lines using any color thread you choose. I used a deep red. 
 Now is the fun part! You can embellish your valentine any way you want. You can even make it into a birthday or graduation theme. For the Valentine theme, I used pinking shears to cut out a stamp, and stitched a scrap of lace where the address would go. You can use fabric markers, or cross-stitch a design. Get creative! Stay inside the rectangular area, and stay within ¼” of the edge, or your design will not align on the front of the envelope.

After you’ve embellished your envelope, place the outer fabric and the inner fabric right sides together. Stitch along the outside edge with a ¼” seam. Leave a gap on the long side about 1 ½”-2” wide.

Trim the excess fabric from the corners and points, and turn it inside out through the gap you left. Poke out the corners using a chopstick or a dull pencil. Press well so that the envelope lies flat.

Turn it over and fold up the bottom of the envelope so that the lowest point at the bottom is is 4 ½” from the highest point on the top, and press well.

Starting at the bottom of the envelope, stitch all the way around using a 1/8” seam allowance. Be sure to backstitch at the beginning and end. I don’t like to use pins, but it may help you keep everything in place. 

Now fold over the top of the envelope and press it into place.
...and you're finished!
You can print out these blank coupons and fill them out with special treats you think your loved one would like.
You could also slip some cash into it if you're making it for a birthday or other occasion.
Have fun with this pattern! I'd love to see your finished products :)

Wednesday, January 25, 2012

Handmade Home

Although I have lived in my house for over a year, it is still pretty bare in terms of paint on the walls and accent pieces like accessories or wall hangings. I love looking through home decor magazines, and browsing ideas on Pinterest. The ideas I like best are the ones you can do yourself, and still get a really professional-looking result.
Here is some inspiration I've found around the 'net. All of it is handmade or DIY, and I would love to have every single piece.

DIY beadboard wallpaper by 320 Sycamore

Recycled pallet coffee table by Sew Homegrown
Source: homedit.com via Brianna on Pinterest


California Key Hanger by OldNewAgain on Etsy

Source: etsy.com via Amy on Pinterest


Handmade Fabric Basket by BaffinBags on Etsy
Source: etsy.com via Amy on Pinterest


Handmade doily rug by ooty on Etsy
Source: etsy.com via Amy on Pinterest


Handmade knobs/drawer pulls by featherandwind on Etsy
Source: etsy.com via Amy on Pinterest

Feel free to check out the blogs and shops I've featured today. They are more easily found through my direct links than through Pinterest.
I've got a lot of projects and ideas on the books, so come back soon for more handmade inspiration and DIY projects!